Chris Hannah Chris Hannah

Chris Hannah

Journal: 28 Mar 2019

Today was a tiny bit more exciting than yesterday.

I posted another guide for Text Case on my blog today, this time about using Siri Shortcuts and the Shortcuts app. I originally planned to have one more, just so I could make it a full week. But I never actually worked out what the fifth guide would be about, as I think the four current guides explain the app quite well. I would place about a 5% chance of there being another guide, so I hope they’re useful to people!

The main thing that made today more interesting, was Captain Marvel. I literally just walked in the house, after seeing it with my sister. It was a really great film, I rank it very highly with some of the best Marvel films. It’s made even more eager to watch Avengers: Endgame when it comes out! I would totally recommend anyone to go and see Captain Marvel, whether you’re familiar with the Marvel universe or not.

Using Siri with Text Case

This is a guide related to my app, Text Case. It’s a utility app that lets you transform text into various different formats. You can find all the guides in one place, and Text Case on the App Store.


Everyone loves Siri. Well they don’t always, but sometimes it can be pretty useful. Fortunately, Text Case supports Siri so that you can convert text into any format using it!

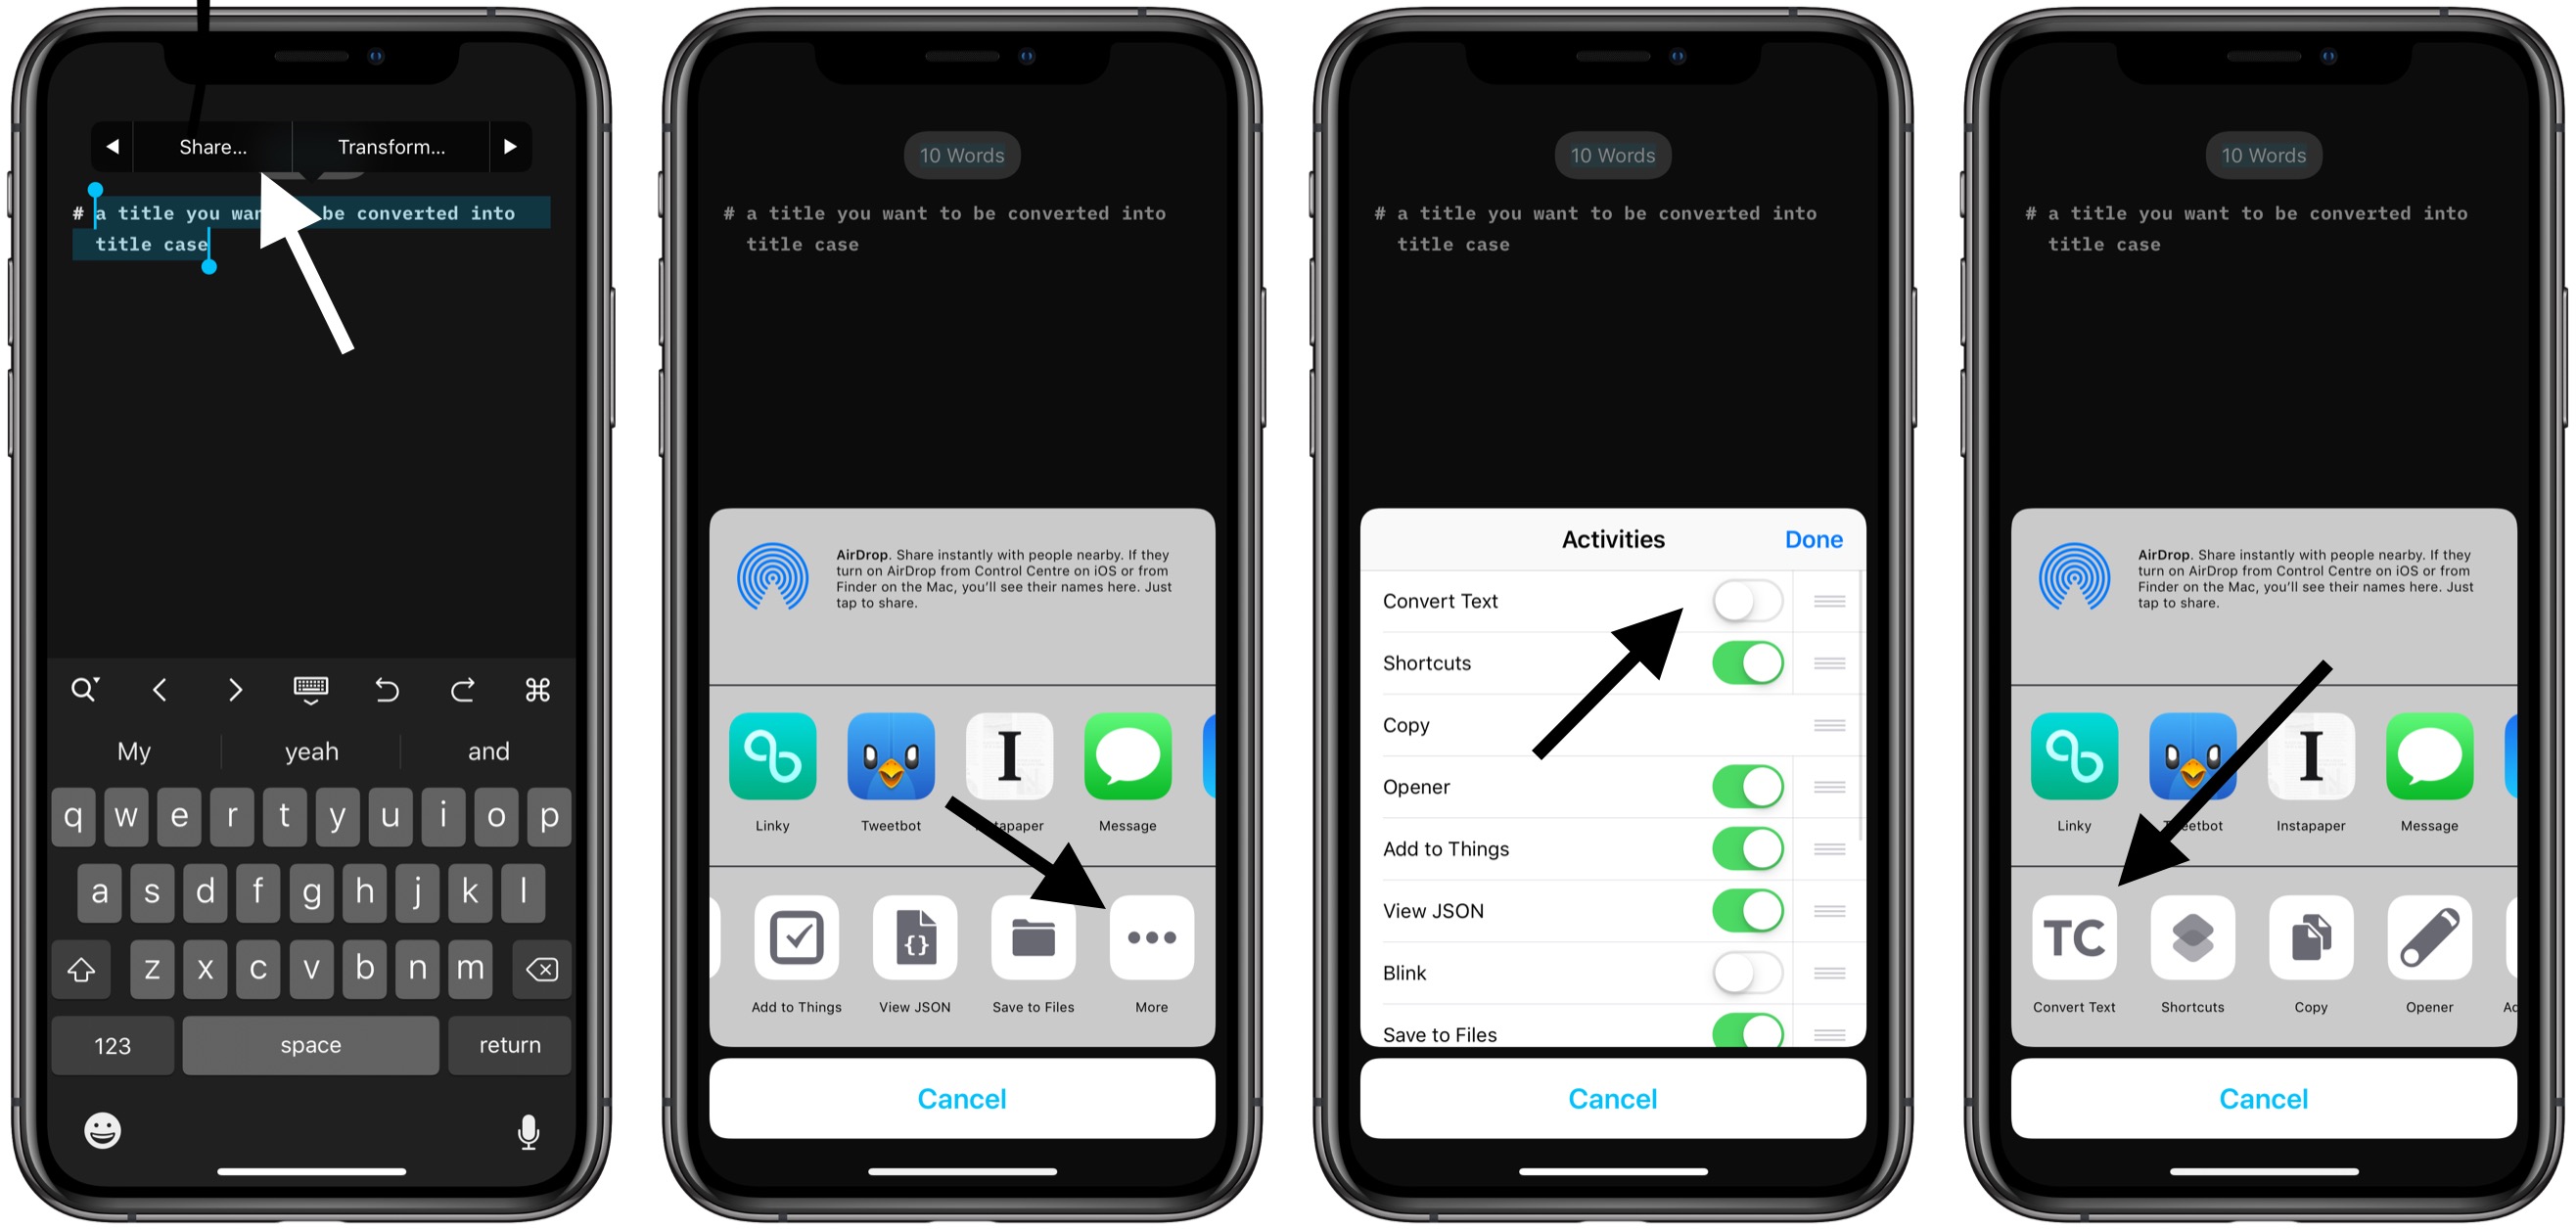
Unfortunately, there’s no way for apps to take any form of input from Siri, so Text Case uses your clipboard as a form of input and output.

Siri Shortcuts

The simplest way to open up Text Case to Siri, is to record a custom phrase for a specific format.

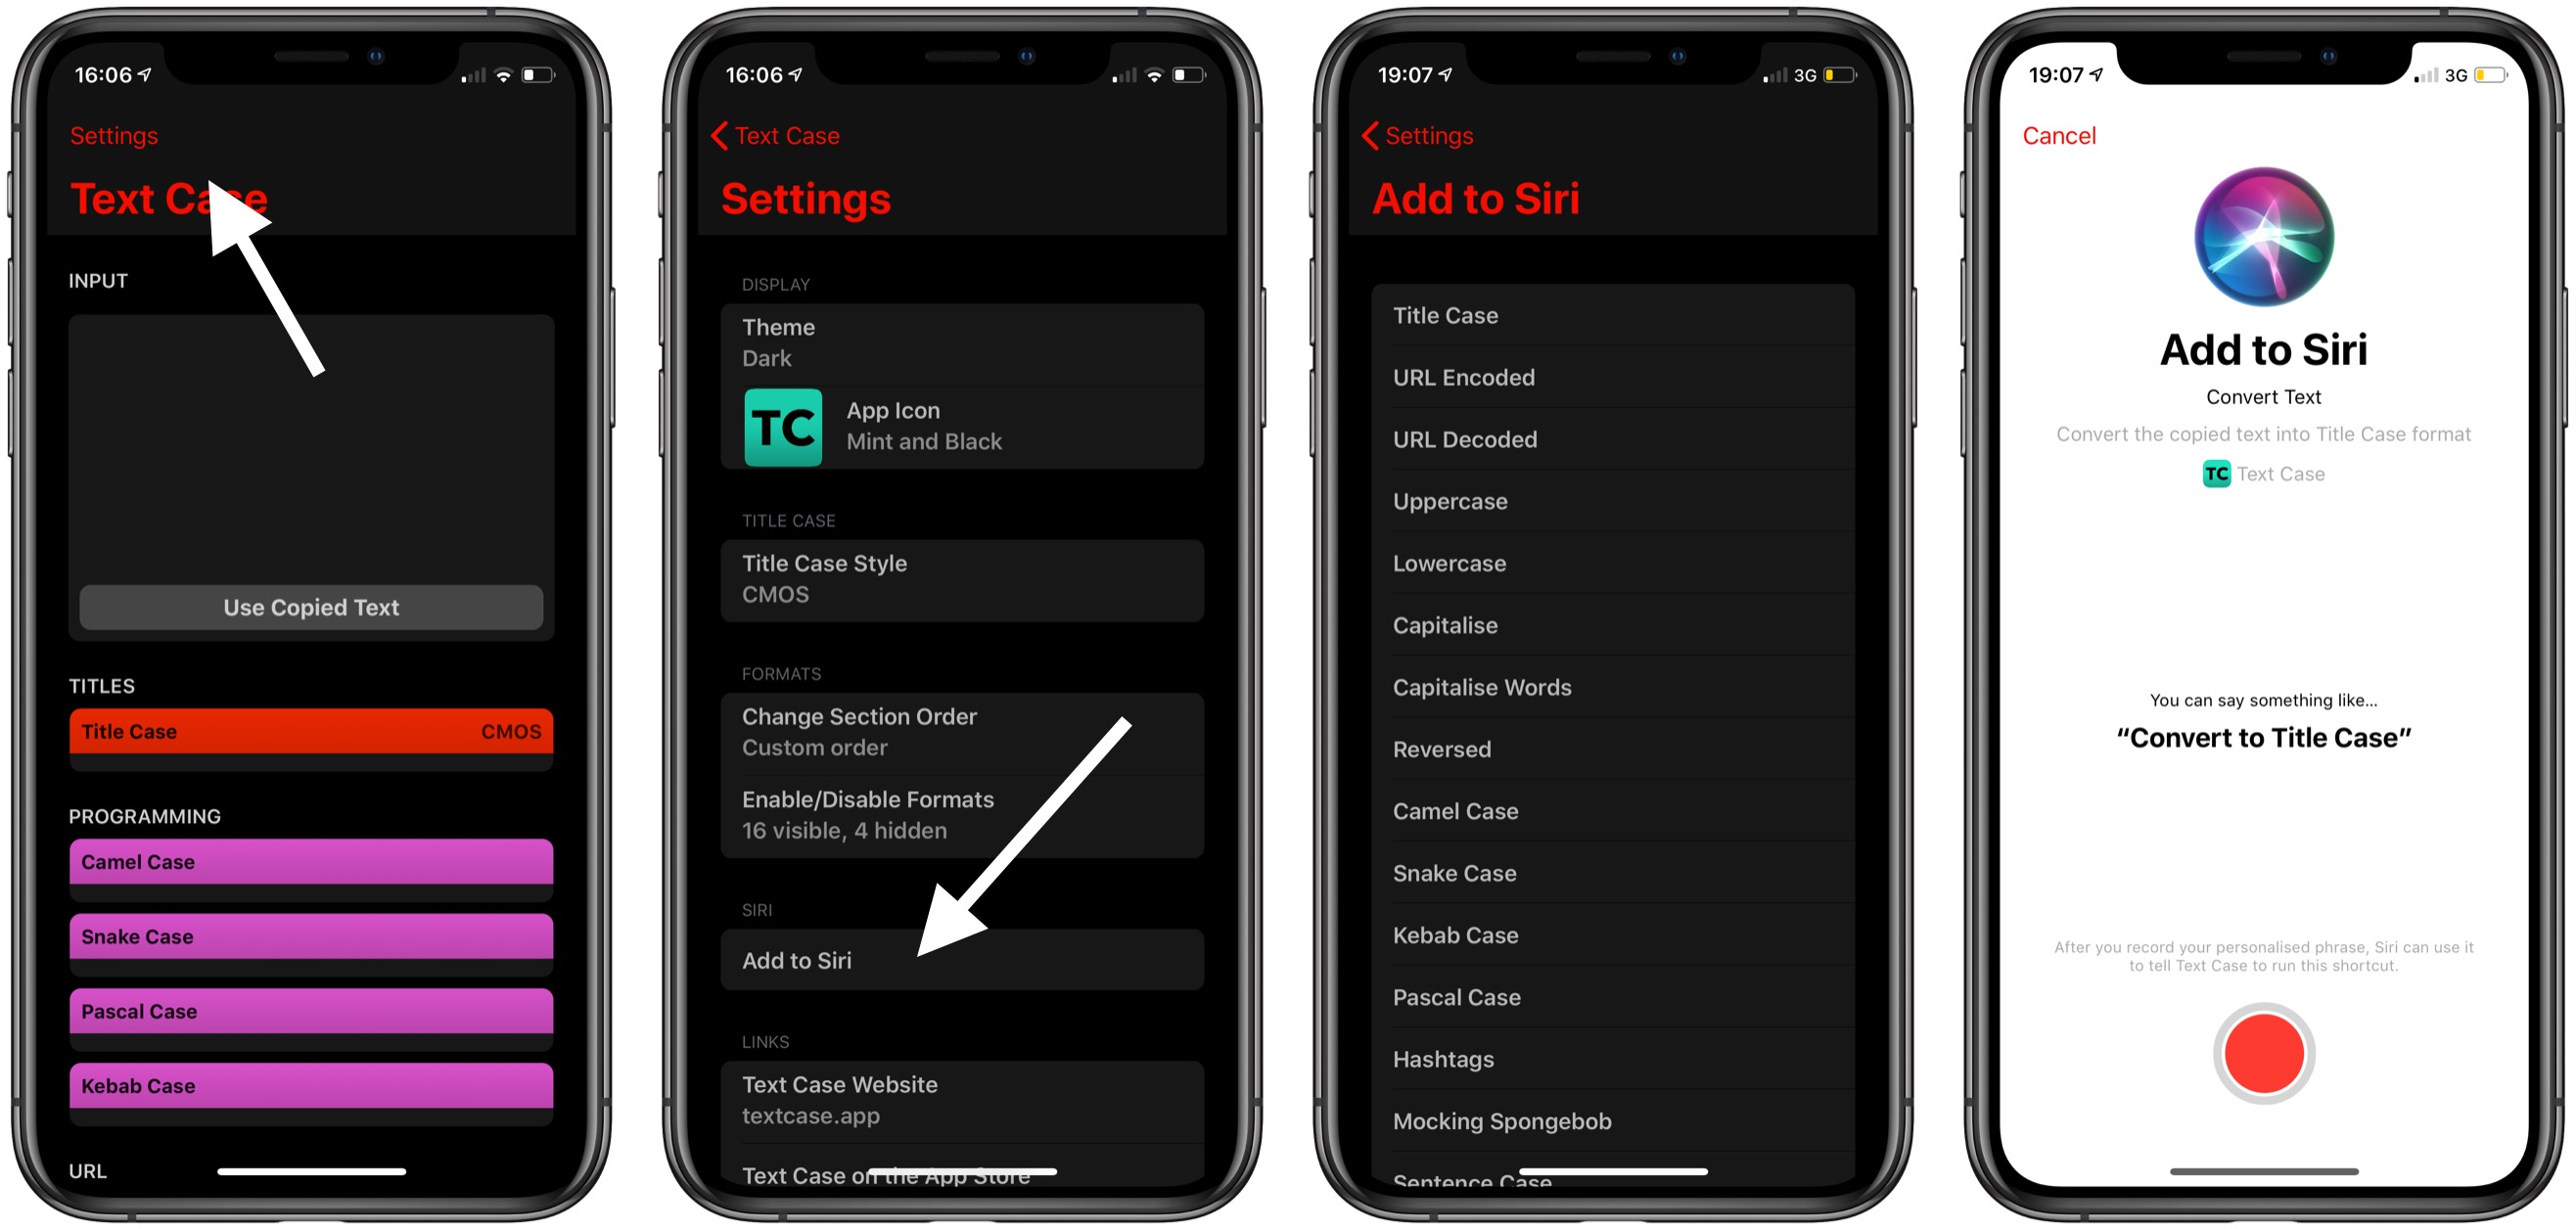
To do this, you’ll need to navigate to the Setting screen, and tap on “Add to Siri”. That will bring up a list of every format in Text Case, and after tapping on one of these, the Siri Shortcut interface will appear, where you can record a phrase to use with this format.

One a Siri Shortcut is set up, to format your text, all you need to do is to copy some text, say the phrase to Siri, and the formatted result will be ready to paste wherever you want.

The Shortcuts App

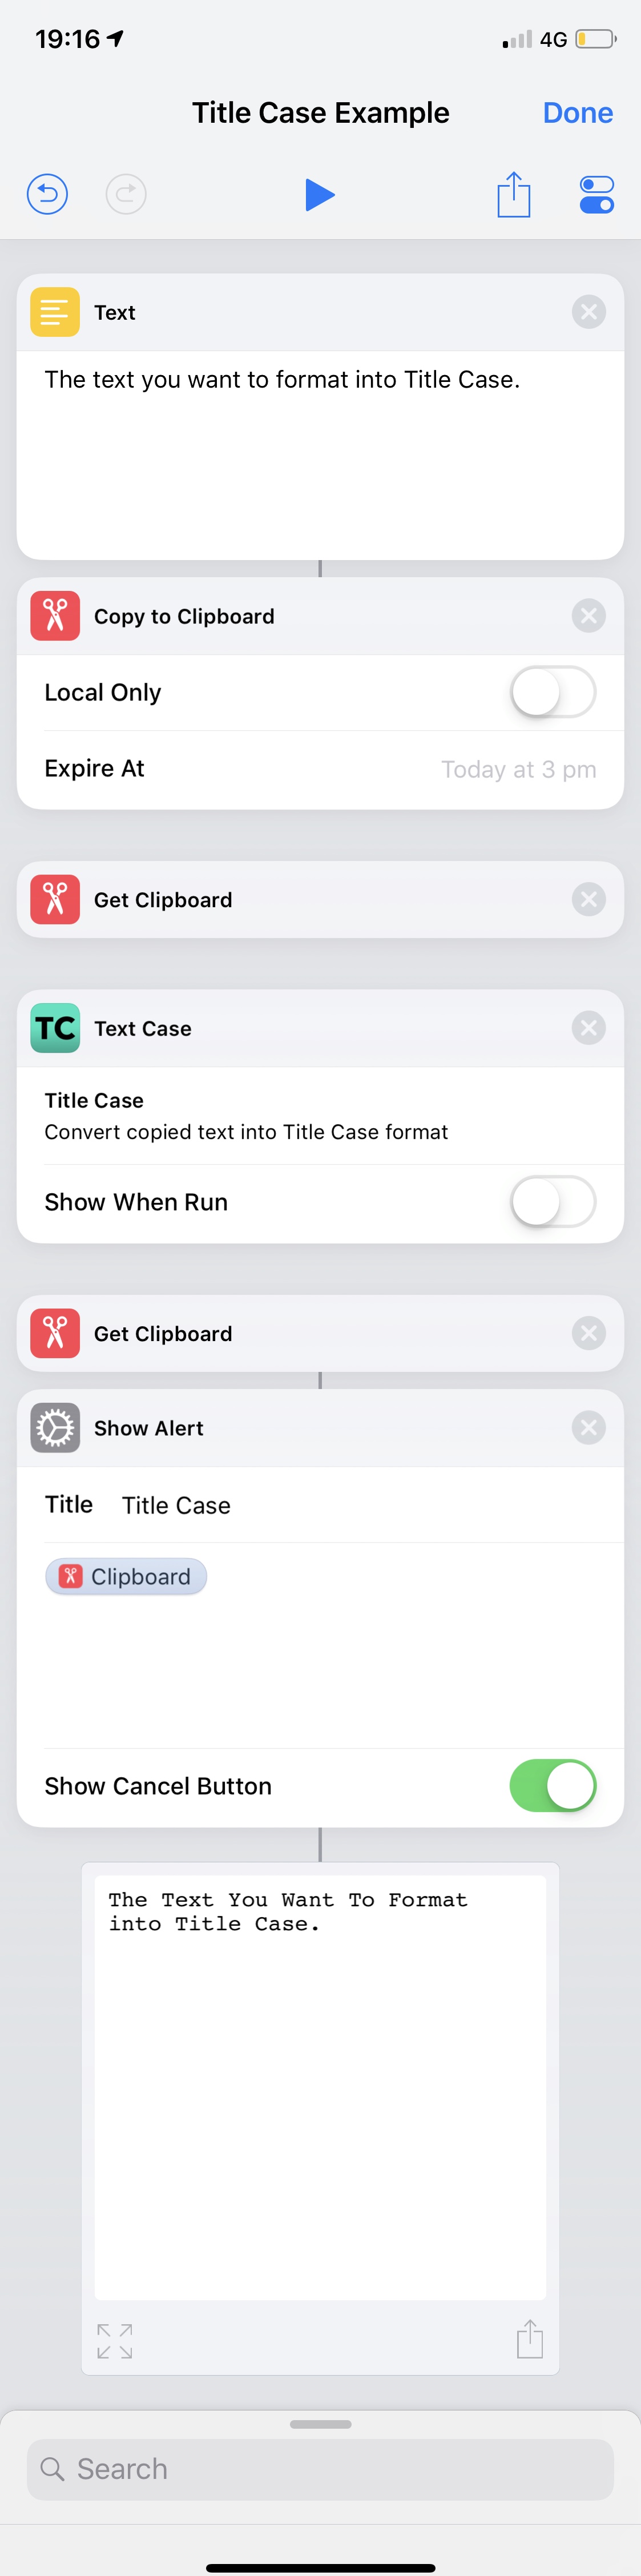
That’s not all you can do with Text Case though, as you can even use these actions within the Shortcuts app.

However, as Text Case deals with the clipboard, you will need to make sure you set the clipboard to the text you want to be formatted, and then retrieve the clipboard when you want to use the results.

Here is a basic example of how you can make use of Text Case inside a Shortcut:


You can download Text Case on the App Store.


Journal: 27 Mar 2019

Another one of them days again!

An average day at work, followed by a slightly more interesting evening!

Perhaps the only productive thing I did today was to post another Text Case guide. Today’s one was about the Action Extension, how to set it up, and how to use it.

Hopefully I’ll have more interesting journal entries again soon, but until then, I’ve still got to continue writing them! I’ve not missed a single day this year.

Using the Action Extension in Text Case To Format Text

This is a guide related to my app, Text Case. It’s a utility app that lets you transform text into various different formats. You can find all the guides in one place, and Text Case on the App Store.


Although the main Text Case app can be a very useful app to have open while you’re formatting a few pieces of text, sometimes you just want a little less friction while you’re writing.

That’s why you can format any text in iOS, simply by selecting text, sharing it to Text Case, and then just tapping once on the format you want to use. It’s a flow I use whenever I’m writing on my iPhone or my iPad, because it allows you to completely focus on your writing, without needing to manually switch apps to just format a title.

Enabling the Extension

First off, you’ll need to enable the Action Extension. This can be quite long-winded, so it’s best to follow along with the screenshots below, or there are some written steps.

  1. Select any text in your favourite text editor.
  2. Tap Share.
  3. When the share sheet appears, on the bottom row you’ll find an option called “More” with three dots as the icon. Tap that.
  4. It should then open a list where you can enable and disable any available actions from your installed apps. You need to enable Text Case’s “Convert Text” action.
  5. After that, tap done, and it will appear in the list of actions in the bottom row of the share sheet.

Formatting Text via the Extension

Once you’ve got it enabled, formatting text is rather simple.

  1. Select the text you want to format.
  2. Tap Share.
  3. Select “Convert Text” from the bottom row of the share sheet.
  4. When Text Case appears, you just need to tap once on the format you want to use. By default Title Case will be the first option.
  5. After you tapped on the formatted title in Text Case, you will be returned to your previous app, where your text should still be selected.
  6. You can now tap on Paste to overwrite the text with the formatted version.

You can download Text Case on the App Store.

Journal: 26 Mar 2019

It’s time for another one of my simple journal entries.

The first half of the day was spent at work, what a surprise! It was a pretty good day.

After work, my girlfriend made pizza for dinner, and we watched “Bad Moms”, which I thought was a very funny film!

I did get around to publishing another Text Case guide on my blog, which was about customising Text Case. Just a little spoiler, you can customise quite a lot!

Customising Text Case

This is a guide related to my app, Text Case. It’s a utility app that lets you transform text into various different formats. You can find all the guides in one place, and Text Case on the App Store.


There’s quite a lot of things that you can change in Text Case, so you can feel more at home while formatting all of your lovely text.

Theme

First off is the theme. There are currently two themes in Text Case, the obvious Light and Dark options. More will come in the future, but alas, that’s not relevant to this guide.

The theme is applied globally, and therefore it affects the app and the share extension. The theme changes the background colour, the input field colours, and the colour the formatted results that appear in the app.

Image 2.PNG

To change the theme, you just need to navigate to the Settings screen, tap on the Theme option at the top, and then select a theme from the list.

App Icon

You can also change how Text Case appears from your home screen, with 22 different icons to choose from.

Image 3.PNG

To change the app icon, you navigate to the Settings screen, tap on App Icon, and select one from the list. An alert will appear to confirm the change.

Title Case Style

As mentioned in a previous guide, “What Is Title Case?“, you can change the style of Title Case that is used within the app. So if you want to know more about Title Case, and how to change it, check out the article.

Formats Section Order

There will always be formats that you use more than others, so that’s why there’s an option to rearrange the format sections in the app.

Image 4.PNG

This can be managed from the Settings screen, under “Change Section Order”. Once there, you can drag the sections to indicate the order you want them displayed in.

Below each section title, you can see the current number of formats that are visible for each one. Just a quick note, if a section has no visible formats, it won’t appear in the formats list when transforming text.

If you do make changes to the order, you can always go back to the default option, by tapping on the Reset button in the top-right corner.

Enable/Disable Formats

Along with rearranging the sections in Text Case, you can hide a format completely, so it won’t appear in the app or share extension.

Image 5.PNG

It’s very simple to do, just choose the “Enable/Disable Formats” from the Settings screen, and then tap to enable or disable formats as you wish!


You can download Text Case on the App Store.

Journal: 25 Mar 2019

It was my first day back at work after my trip to Norway, and thank god it wasn’t stressful!

Of course, just before I finished work, I started to watch the Apple Event. I had to continue it on the commute home, with sporadic pauses because of my train going through tunnels, but I got there in the end.

I’m not going to write too much about the event, but overall I liked it. News and Apple tv look like something I’d enjoy, I’ll have to wait for Apple Arcade before I make a judgment on that, and I don’t particularly care about the Apple Card. The Card is the thing I have the strongest opinions of, and it’s the thing I like the least. I’m not a fan of credit cards at all, and there’s nothing that Apple can do to get me on board. However, I’m not even eligible for it (UK), so I’m not going to waste anymore of my time worrying about it.

One thing I published on the blog today, was a guide about Title Case, including what it is, the popular formats, and also how you can select one in Text Case. I’ll have one tomorrow as well, so keep your eyes peeled!

What Is Title Case?

This is a guide related to my app, Text Case. It’s a utility app that lets you transform text into various different formats. You can find all the guides in one place, and Text Case on the App Store.


Title Case is the term people use when referring to the format in which titles should be capitalised. However, this isn’t an entirely objective format, as there are multiple standards that different writers use, and also some choose to customise them even further.

In Text Case, I’ve chosen to support four different standards of Title Case:

These standards are much bigger than just rules on how titles should be capitalised, but it is, of course, the only relevant part for Text Case.

AP

AP format is commonly used by news organisations, as the Associated Press offer style guides for a wide arrange of writing, and it can be easy to use one entire standard.

With AP format, the first and last words are always capitalised, along with all verbs, nouns, and adjectives. Any prepositions or conjunctions that are four characters or more are also capitalised.

APA

APA format is very similar to AP format, in that it uses the same base rules, except that the last word isn’t capitalised by default.

MLA

MLA format is commonly used by academic writers when writing papers. It is a rather simple standard to follow, with all words being capitalised, except for a specific number of conjunctions.

CMOS

CMOS is one of the more popular standards that I’ve seen among bloggers, and it’s one that I use myself. In CMOS, all words are capitalised except for any preposition or conjunction. It’s commonly used when doing comprehensive, in-depth writing.

Changing Title Case Style in Text Case

You can change the Title Case style by navigating to the Settings page, choosing “Text Case Style”, and then selecting the style that you wish you use.

You can also tap on the Info icon on any of the styles, to find out more information on how they are used, and also a link to read more about them.

When you’re using the Title Case format, you can see the style that is being used on the top right of the formatted result. For example, the app in the screenshot is using APA style.


You can download Text Case on the App Store.

Journal: 24 Mar 2019

So what I thought would be a quiet day in, actually turned into something a bit more active than I expected.

It started well, as I spend a few hours watching Lost, and playing Fifa.

However my mum asked if I could clean out a few of my last things from my old bedroom, as she’s getting some kind of work done (I can’t quite remember exactly). So I popped over, and organised that.

While I was at my parents house, I saw their garden fork and shovel, which made me remember that I needed to do work in my own garden. Needless to say, I borrowed the fork and shovel.

I then spent a while trying to clear my garden. This involved mainly digging up paving slabs, and other bits of random rock.

The previous owner clearly didn’t do any kind of work in the garden. I e have a partial patio that’s been covered in stones, and what seemed to be a small leading into the garden, was actually two paving slabs, on top of a layer of grass, with a hidden concrete layer below it.

We originally suspected a draining issue in the soil due the amount of moss growing in certain areas. But it seems that this issue was caused by hidden slabs under a small layer of soil, and also a huge section of the soil actually being clay.

I have certainly got a job ahead of me. 😬

After my garden activities, I cooked a chicken curry for dinner, and then I’ve been relaxing as much as I can before going back to work tomorrow. Of course I had to clean the dishes, and sort out my bag for work, but at least I got a few more episodes of Lost in.

Journal: 23 Mar 2019

So today was our last day in Oslo, and it was spent mostly travelling back home to London.

As usual, after getting sorted, we went to what became our regular coffee shop, for a morning coffee.

We then hang about there for a bit, before getting the train to the Airport. Once there, we had a bit of lunch, and headed through security. Although we were there for a few hours (we arrived very early), the individual processes in the airport such as customs, passport control, and boarding, were all very quick.

That’s a complete contrast to what we experienced in London Stanstead though, as it seems things were just arbitrarily delayed in every part. For example, for the automated passport control, only 18 out of 30 machines were being used. And there was one person that was attempting to control the flow of people through the machines. Even to the point where a machine freed up, the next person entered, and was rashly told to get out, simply because he had not pointed him to the machine.

After getting home, I’ve just been relaxing after a few days of constant walking. I first made dinner, then I spend a few hours watching endless episodes of Lost, and playing some Fifa.